Category Archives: Breakfast

My sourdough buttermilk scones/biscuits…

I’ve just published a recipe that I devised for these sourdough biscuits/scones on my sourdough blog, and I think some of you would like them too, so I thought I’d share the link here for you…

Sourdough buttermilk scones/biscuits

They come with a warning: they’re very moreish!!!

An update on my fruit yeast water bread…

Further to my previous post about generating wild yeast from fruit and water, I have continued to make more loaves and experiment with different fruits and would like to share some more ideas and tips…

This loaf was made with yeast water derived from an apple

I have now made yeast water from apples, dates, dried figs and a fresh fig. They have all worked well, but so far my favourites are the dates and apples. 

This bubbly water was generated from dates 

I have observed a few things that I feel may be of use in case you are trying this method, or would like to experiment yourself. I have continued to follow the method for making the yeast waters, and for then making the bread from my previous post and they have continued to be a success…

Bread made with yeast water cultivated from a fig

I can now tell you that different fruits result in different shaped loaves; I’ve had rounded loaves from apples and peaked loaves from figs – just like the shape of the fruits! And the apple water generates the most wonderful aroma in the final loaf.

The second time that I made fruit yeast water from an apple, it didn’t generate any bubbles, but when I opened the jar it gave an audible puff of air several days in a row, and it smelt strongly, so I chanced it and it worked well – so maybe bubbles aren’t always necessary. (I know that one person who made apple yeast water tried drinking it and likened it to cider!) 

When I made date yeast water, I used up nearly all of it for a couple of loaves, then I topped the jar up with a bit more water and it generated more yeast water from the same dates. I do think that each fruit can generate enough water for several loaves – I’ve ended up with water for 2 or 3 loaves at a time so I’ve made them and frozen the loaves that I didn’t immediately need and they feeeze and defrost well. 

Following my posts on here and Instagram, I know that several people around the world have been experimenting with fruit yeast water with varying results. I do think that different fruits in different countries generate different results, and flour from different countries DEFINITELY behaves differently. Only you will know from your own experience whether the flour in your part of the world requires more or less water than mine. 

​​Making the starter with the yeast water and flour works best when made with strong bread flour. Other flours will generate a starter but it will not be as strong and could then result in less rise in the bake. A bubbly gluten free starter can be made with buckwheat flour and fruit yeast water but I’ve only seen it in use in a cake so far. 

Likewise with ovens, and this goes for any baking and cooking, all ovens behave differently, even ovens that are the same make and model! Therefore, you may need to amend my temperatures and timings based on knowledge of your own oven.

I hope these tips are helpful and that you have fun if you do try the fruit yeast water…check out Suzanne’s experience so far…

Lunch and labneh…but not together…

This is a recent pan full of loveliness that was my lunch one day last week…one of those creations you could just eat again…and again…and again…so here’s what I did…

I put some coconut oil in a pan over a medium heat and added a chopped red onion and cooked it for a few minutes, whilst I cut up two medium tomatoes; I added the tomatoes and cooked for a further few minutes; added some drained chickpeas; added a couple of tablespoons of my stock of rose harissa from the freezer; added chopped avocado that needed using up; then made a hole in the middle of it all and added eggs sprinkled with my rose harissa spice mix

This was my quick fix when I came home hungry and ready for food and it was perfect! I ate it straight from the pan with gusto!! 

Having also recently made some labneh again, I thought I’d share that too…

Labneh is basically ‘yoghurt cheese’, used often in middle eastern and Levantine cuisines. It is often offered for breakfast or as part of a mezze with olive oil drizzled over the top, mine also has chilli flakes sprinkled over it. 

It is so easy to make, it’s basically just drained yoghurt. It’s nicest if you use full fat natural yoghurt to make it with, but I have also used low fat yoghurt in the past, it just makes it a lot sharper. 

Determine how you can create a contraption to drain the yoghurt over (you’ll see what I did in the photos) and then scoop your yoghurt into a square of muslin and hang it over your jug/bowl..

My muslin is tied tightly to the wooden handle of a spatula that fits across the top of the jug; then put it in the fridge, preferably overnight…

This was what I took back out of the fridge the following morning. 

Then scrape the lovely labneh from the muslin into a bowl and eat immediately or store in the fridge and use like any other soft cheese…

As you can see it really does firm up without becoming solid..

With the liquid that you drain from the yoghurt, you could throw it, or use it to cook vegetables in or add to recipes. I added mine to some spiced spinach dough for making flatbreads.

I like my labneh plain and unadulterated, but you can add salt before draining the yoghurt if you prefer, or play around with other flavour additions, sweet or savoury based on your taste. 

This was some of that labneh on top of some of my experimental spiced spinach dough and topped with roasted tomatoes..

Mmmmmm….might have to go and make some more!! 

My breakfast chai spice mix…

I realised recently that I don’t ever eat a meal that doesn’t have spices in it; whether it’s a full of cacophony of spices, or merely a sprinkle of roasted cumin or sumac, spices are a big part of my world. And it’s not just in my food, I start each day with turmeric capsules and a cayenne pepper capsule…I think if you cooked me I’d be pretty tasty!!! 

Let’s move on from that horrible idea…to my breakfast…

I cannot bring you a picturesque shot of my breakfast because I am far too happily eating it in the mornings to spend time pimping and preening the bowl for a perfect photo; I did consider making two lots one morning just to have one to make pretty, but who needs all that? This is a bowl for eating, not looks. 

This is my chai spiced banana porridge. And I love it!!! 

I eat this every morning, because I love it so much, it’s full of goodness, and if I even think about having something else, I already start missing my lovely porridge. I will tell you how I make it, but what I really want to share is my spice mix…

Which also isn’t pretty to look at really, but the taste and smell is beautiful! 

I was recently sent some chai spices and tea to try from my lovely friends at Spice Kitchen UK and this is what inspired my breakfast spices. I made the tea and spice infused milky drink as directed, but I was far more interested in trying the chai spices minus the tea…so I put some in my porridge. 

It worked really well except for the fact that the spice mix was created for making tea and being strained and therefore, the spices don’t need to be finely ground, consequently, I was biting into peppercorns and cardamoms which wasn’t so good, but the overall effect was fab. So I decided to make my own version..

Chai spice is made up of the spices that you would associate with Christmas: the beautiful cinnamon, cloves, nutmeg and ginger take you right into December. Add in the cardamom and black pepper and it becomes the wonderful chai creation of India. For my breakfast mix, I left out the pepper and increased the proportion of cinnamon, but you could of course amend it to your tastes..

Based on ground spices I mix:

4 tbsp cinnamon

2 tbsp ginger

1 tbsp cardamom

1 tbsp cloves

1/2 tbsp nutmeg

Mix together well and store in an airtight jar. 

To make my breakfast, I soak my oats overnight in water with a huge heaped teaspoonful of the spice mix, then add mashed banana in the morning before heating it all. And then I take time to eat it and savour it and love it…and then I start looking forward to the next morning when I can eat it all again! 

The aroma on its own is enough to make you smile! 

I’m sure this spice mix would work perfectly in cakes and muffins and drinks, it makes me remember Selma’s wonderful award winning chai spiced banana bread 🙂 

I hope you’re having a great start to the week xx

Za’atar & goats cheese mixed flour sourdough bread…

 I’ve been having fun with my sourdough starter again recently, as you will have seen from my previous post, and may have already seen on Instagram…? Well, this loaf was my biggest experiment yet… 

I’ve seen lots of wonderful looking filled or flavoured loaves of bread on others people’s blogs and have wanted to try out some ideas but wasn’t sure what effect the added ingredients would have on the dough. This week I had put together two different sourdough doughs so decided to risk one of them. 

The dough was a mixture of spelt flour, kamut/Khorason flour and a smaller amount of strong white flour, consequently the dough was quite sloppy and not the easiest to work with. When you use spelt flour, whether using 100% spelt or with a small percentage of other strong bread flours as I did here, the dough initially feels quite sturdy, but quickly loosens up as it proves, it is therefore often useful to bake the bread in a tin to help it keep a shape. I didn’t do that this time which is why when you bake the bread, the dough spreads before it rises during the bake, hence why the bread looks flatter than previous loaves, it made up for its looks in taste though 🙂  

So, I basically put the dough together based on the overnight recipe I’ve used many times before, using 200g spelt flour, 200g kamut flour & 100g strong white flour, 160g bubbly starter & 290g water. It developed and rose beautifully overnight and the next day I used a scraper to pour the dough onto a large tray sprinkled with flour and crumbled mild goats cheese over the top along with some za’atar mixed with olive oil.. 

I then had to use the scraper to loosely mix it through the dough, I didn’t work it too much, then left it to rise again whilst I heated the oven.. 

I heated the oven to 250C (fan) then poured – yes, poured, it was that sloppy! – the dough into my roasting pan, put the lid on, turned the oven down to 220C and baked it for 30 minutes with the lid on, and a further 12 minutes without it. The smell as it baked was AMAZING!!!!!!! OMG! spelt smells amazing as you bake it, so does kamut, put them together with the spices, and woohoo!!! heaven in your nose!  

  I ate it on its own yesterday, it didn’t need anything with it to be honest. By this morning the aroma of the za’atar filled the kitchen and it took all my will power to wait until lunch time to have some! 

I toasted a couple of slices and topped them with ricotta cheese and some cherry tomatoes and garlic that I had slow roasted yesterday.. 

  So good!! And check me out using my gorgeous new bowls from Sytch Farm Studios – I’ve been looking at them and loving them for three weeks now so finally decided to use them…I struggle to use new things! I like to cherish them in all their new beautiful glory for a while, I’m exactly the same with clothes!!

Anyway, I hope you feel inspired to chuck something new in your dough, next time I will add more goats cheese, as it got a bit lost. I hope my lovely friends at this week’s Fiesta Friday enjoy my loaf, do join us and our lovely co hosts this week, the fabulous Linda and Caroline

Have a great weekend! 

What would you feed me…Melissa?


This week’s post is truly inspirational, and may well come at a perfect time for some of you if you’ve overindulged over Easter…

When I invited Melissa from The Glen House to take part in my guest post series I knew that it may well be a challenge for her to fulfil the guidelines of bringing a vegetarian, sugar free, gluten free, healthy dish, but she jumped at the chance of being involved, which made me very happy! Lovely, friendly, vivacious, Melissa makes amazing cakes, she loves baking, and eats very differently from me, but her post captures the essence of the series completely, I hope you enjoy it..

So, Melissa, what would you feed me? 

Elaine asked me write a post that was gluten free and sugar free. Me? Me that uses copious amounts of sugar, chocolate, butter and flour in her posts and in her every day life? Why not, I thought!

But I wasn’t thinking.

Elaine and I are from the opposite ends of the foodie spectrum; she’ll often post a piece and my response would be something along the line that “it would be great covered in chocolate”. Elaine posts healthy dishes and snacks, whilst I write about cakes and cookies. How on earth could I write her sort of post? 

I knew I’d have to stick to what I know, there was no point just serving up a fruit salad or a plate of veg. I needed to make Elaine something ‘sweet’ like a cake or muffin, but I had to use her sort of ‘sugar’. I had to put myself in her shoes…  
So, for the month of March I gave up sugar. I GAVE UP SUGAR. I-GAVE-UP-SUGAR!!!!!!!!!!!!!!!!!!!!!!!!!!!!!!!!!!!!!! No more cakes, biscuits, muffins, Haribo, chocolate, alcohol…. Even bananas and mangos were off limit! I stopped snacking altogether and stuck to three meals a day. While I was at it, I did away with potatoes and bread too! After two days of mind blowing headaches, I was ok. My sugar fix came from berries, I rekindled my long lost love affair with avacodos and my palette began to change. I lost a stone and a half in four weeks by eating this way- not diet AT ALL, just eating properly.

New ways of cooking and baking called out to me; I discovered Ella Woodward of Deliciously Ella fame and Sarah Wilson, who has written several books on life without sugar. I began to understand how to use nuts and fruit to replace eggs, butter and sugar and how I can replace normal flour with healthier alternatives. So, I’m making Elaine a recipe I’ve come up with myself, based on my research.  
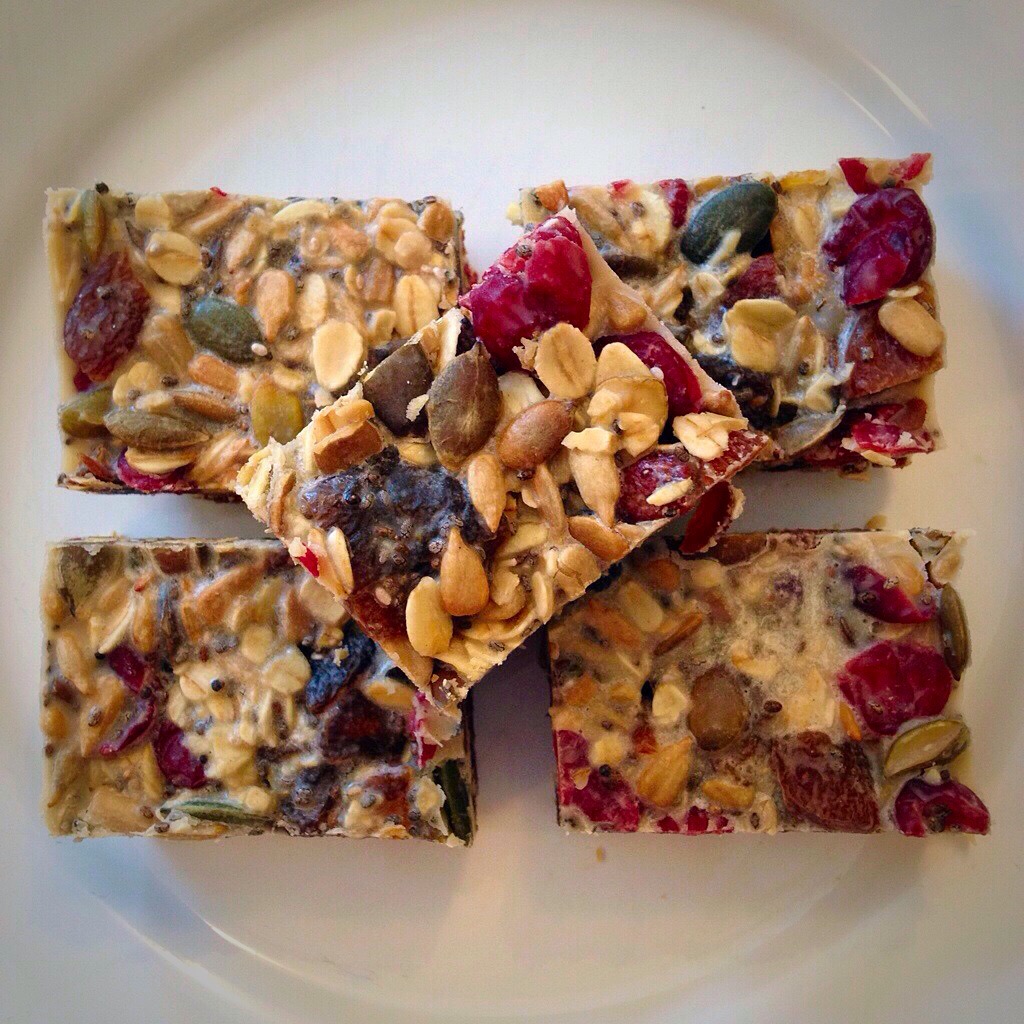
Banana, Date and Pecan Muffins

Ingredients:

1 cup pecans
1 cup brown rice flour
1 cup dates
2 large bananas
1/2 cup almond milk
2 tsp gluten free baking powder
vanilla (I used Dr Oekter vanilla grinder)
a pinch of maldon salt

 Method:

Preheat the oven 180 degrees and line a muffin tin. Blend the pecans to a fine powder in a food processer. Add them into a bowl with the other dry ingredients and stir. Mix the milk, dates, bananas and vanilla and blend until smooth. Stir the wet ingredients in with the dry ingredients and spoon into the muffin cases. Bake in the oven for 20-25 minutes.

I enjoyed my banana goodies with a cup of liquorice tea (try it, it’s amazing!) 


32 days after giving up sugar and I can still count the amount of sugar based ‘treats’ I’ve had on one hand. I can’t honestly say that I will give up sugar completely, but I will never go back to eating the amount I did before. NEVER.


Melissa xx

Darling Melissa, I LOVE your muffins, but more than that, I love how you embraced the challenge and what you achieved for yourself. What you have done isn’t easy, sugar is a drug and not easy to give up, and you achieved that. Huge respect from me, honey! I hope you feel fabulous xx

Time for some goodness snacks (and how to make them!)..

2015/01/img_6873.jpgIt’s been a while since I’ve posted any of my goodness goodies, I make different ones every week, but don’t always share them – I don’t want anyone to get bored!!!

Last week I read two different recipes on two different blogs, one for making your own coconut butter, and one for making your own sunbutter…so that’s what I did, I made them, then used them in some bars.

To make coconut butter you literally just throw raw coconut into your nutribullet and whizz it until it becomes liquid. After a while it then solidifies and becomes butter. The same with the sunbutter – whizz up sunflower seeds with coconut oil (I used my newly made coconut butter), it liquefies then sets more solid.

2015/01/img_6922.jpgI wanted to make some goodness bars that were nut free, so the sunbutter was perfect for binding the bars. I just threw various seeds and dried fruit into a blender and chopped it all up, mixed it with the liquid sunbutter plus some extra coconut oil, then left it to set. I made some with nuts at the same time..

2015/01/img_6923.jpgI also threw together some others with a mixture of unsulphured apricots and mixed nuts, almond butter and coconut oil (more details at the end of this post)..

2015/01/img_6924.jpgI have recently discovered two new fabulous products which I used in these, Pip&Nut almond butter and Lucy Bee Coconut Oil:

2015/01/img_0328.jpg

2015/01/img_6891.jpgBoth very very nice products, and I’ve tried and used many and various nut butters and coconut oils, and I can tell you that these are both rather lovely! (This is my opinion as a consumer, I have not been asked/paid to write this).

There are lots and lots more versions of my goodness snacks in my recipe index, but to give you the basics of making any of these, here is what I do..

I just chuck whatever dried fruit/nuts/seeds I have or fancy into my small bowl blender and chop them up to a fair sized crumb.
Then mix a good couple of tablespoons of nut butter of your choice and coconut oil together and melt them together in the microwave, usually takes 60-90 seconds, then stir this through the mixture, mixing well through the fruit and nuts. You basically want a good coating on everything.
I then use a silicone ice cube tray, fill each cube up and press it down with the back of a spoon, then freeze for 30 mins.
Press them out and store them in the fridge.
Et voila!

Enjoy xx

2015/01/img_6176.jpg